In Sitecore, when creating a site that's following the adaptive design paradigm (i.e. different views per different device types), the most usual way of structuring the components and presentation details of the various items in sitecore is having two (or more) sitecore devices, each with its own set of presentation details.
This is generally OK, however it can incur a non-trivial management overhead, particularly if the content authors primarily use the Experience Editor for entering components: they have to remember to perform the same tasks in all Sitecore devices, and quite possibly also re-issue the same data entry twice or even thrice, if the site caters for tablets separately.
On the other handm one of the key features of MVC4 onwards, was the ability to target specific devices using different views per device type. This feature is well described in the official Microsoft documentation for ASP.NET MVC 4:
"You can override any view (including layouts and partial views) for mobile browsers in general, for an individual mobile browser, or for any specific browser."
This feature is supposed to work out of the box. You're supposed to be able to override the "DisplayModeProvider.Instance.Modes", adding your own modes, with your own custom identification names, and then ASP.NET MVC will automagically use the specific *.<idname>.cshtml views instead of the default *.cshtml ones, when you particular view mode has been activated for a request.
BUT... not in Sitecore.
When I naively tried that in Sitecore, I got the system to identify my mobile browser properly, but it always served the *.cshtml and never the *.Mobile.cshtml. Slearly something has been replaced in the ASP.NET MVC rendering pipeline.
When an out-of-the-box ASP.NET MVC feature doesn't work in Sitecore, you know that you're in for a ride. Buckle up, it's going to be a thrill!
A bit of resourceful and innovative search in the sitecore configuration pointed to the proper location I should be tampering with to get things to go my way: a pipeline aptly named
mvc.getRenderer
After reading a bit how the relevant processor is structured, through a decompiler, I rolled out my own:
using Sitecore.Mvc.Pipelines.Response.GetRenderer;using Sitecore.Mvc.Presentation;public class GetDeviceViewRenderer : GetViewRenderer { public override void Process(GetRendererArgs args) { base.Process(args); if (!Sitecore.Context.Device.IsDefault) return; var viewRendering = args.Result as ViewRenderer; if (viewRendering != null) { args.Result = new DeviceViewRenderer { ViewPath = viewRendering.ViewPath, Rendering = viewRendering.Rendering }; } } } }namespace MobileDetectionProcessor
{
This class doesn't do much. It just checks whether the default sitecore device has been overriden (more about that further down), and if not, it assigns a custom implementation of Sitecore.Mvc.Presentation.ViewRenderer as the current view renderer (the class responsible for translating sitecore presentation details data into actual views and controller actions).
The custom ViewRenderer is also simple, but not overly so:
using System.IO;
using System.Web.Hosting;
using Sitecore.Mvc.Presentation;namespace MobileDetectionProcessor { public class DeviceViewRenderer : ViewRenderer { public override void Render(TextWriter writer) { if (System.Web.HttpContext.Current.Items.Contains("sc::device::current") && !string.IsNullOrEmpty(System.Web.HttpContext.Current.Items["sc::device::current"] as string)) { var deviceExtension = System.Web.HttpContext.Current.Items["sc::device::current"] as string; var extension = Path.GetExtension(ViewPath); var filePath = Path.ChangeExtension(ViewPath, deviceExtension + extension); if (HostingEnvironment.VirtualPathProvider.FileExists(filePath)) ViewPath = filePath; } base.Render(writer); } } }
What it does, is that it checks for the value for a particular Context.Items key, and interpolates that value into the razor view's name as an extension. So if the "sc::device::current" key contains any non-empty string value (say "Mobile") then for razorscript index.cshtml this viewrenderer will try to locate the razorscript index.Mobile.cshtml.
Finally, add the following config patch to have these activated:
<?xml version="1.0" encoding="utf-8" ?>
<configuration xmlns:patch="http://www.sitecore.net/xmlconfig/">
  <sitecore>
    <pipelines>
      <mvc.getRenderer>
        <processor type="MobileDetectionProcessor.GetDeviceViewRenderer, MobileDetectionProcessor" patch:instead="processor[@type='Sitecore.Mvc.Pipelines.Response.GetRenderer.GetViewRenderer, Sitecore.Mvc']"/>
      </mvc.getRenderer>
    </pipelines>
  </sitecore>
</configuration>
The above combination is enough to re-enstate the targeted-view-per-browser characteristic. However we are still one piece short: We've set up the system to automagically change razor scripts based on a specific key within Context.Items but we've not seen how to actually set that key/value pair.
To that end, we'll have to tap into the Application_Start event of ASP.NET. Luckily, Sitecore does have a pipeline that runs within the Application_Start event: the "initialize" pipeline.
namespace MobileDetectionProcessor
{
    public class RegisterDeviceMode
    {
        public virtual void Process(PipelineArgs args)
        {
            DisplayModeProvider.Instance.Modes.Insert(0, new DeviceDisplayMode());
        }
    }
}
This is the standard, plain-vanilla ASP.NET MVC way of adding custom DisplayModes into your application. These are processed in order, and the first one that has its "ContextCondition" method return true is used throughout. Here, we're adding a custom DisplayMode, that will be handling all our device-targetted razor views:
using System;
using System.IO;
using System.Web.WebPages;
using Sitecore.Mvc.Extensions;
namespace MobileDetectionProcessor
{
public class DeviceDisplayMode : IDisplayMode
{
public bool CanHandleContext(HttpContextBase httpContext)
{
//Is it an Sitecore MVC route?
var isContentUrl = httpContext.Items["sc::IsContentUrl"] as string;
if (string.IsNullOrEmpty(isContentUrl) || !isContentUrl.ToBool()) return false;
return this.CanHandle(httpContext);
}
private bool CanHandle(HttpContextBase httpContext)
{
var devtype = DeviceType(httpContext);
if (!httpContext.Items.Contains("sc::device::current"))
{
httpContext.Items.Add("sc::device::current", devtype);
}
else
{
httpContext.Items["sc::device::current"] = devtype;
}
if (!string.IsNullOrEmpty(devtype))
{
return true;
}
return false;
}
public DisplayInfo GetDisplayInfo(HttpContextBase httpContext, string virtualPath, Func<string, bool> virtualPathExists)
{
var extension = Path.GetExtension(virtualPath);
var filePath = Path.ChangeExtension(virtualPath, DeviceType(httpContext) + extension);
if (filePath != null && virtualPathExists(filePath)) return new DisplayInfo(filePath, this);
return null;
}
public string DisplayModeId
{
get
{
//Return a key to ensure the view is correctly cached in the ViewEngine
return "Device";
}
}
protected bool IsTablet(string userAgent)
{
var tablets = new[] {
"ipad",
"android 3",
"xoom",
"sch-i800",
"tablet",
"kindle",
"playbook"
};
return (
tablets.Any(userAgent.ToLower().Contains) ||
(userAgent.ToLower().Contains("android") && !userAgent.ToLower().Contains("mobile")));
}
protected bool IsMobile(string userAgent)
{
var mobiles = new[] {
"midp", "j2me", "avant", "docomo", "novarra", "palmos", "palmsource", "240x320",
"opwv", "chtml", "pda", "windows ce", "mmp/", "blackberry", "mib/", "symbian",
"wireless", "nokia", "hand", "mobi", "phone", "cdm", "up.b", "audio", "sie-", "sec-",
"samsung", "htc", "mot-", "mitsu", "sagem", "sony" , "alcatel", "lg", "eric", "vx",
"NEC", "philips", "mmm", "xx", "panasonic", "sharp", "wap", "sch", "rover", "pocket",
"benq", "java", "pt", "pg", "vox", "amoi", "bird", "compal", "kg", "voda",
"sany", "kdd", "dbt", "sendo", "sgh", "gradi", "jb", "dddi", "moto", "iphone",
"Opera Mini"
};
return (mobiles.Any(userAgent.ToLower().Contains));
}
protected string DeviceType(HttpContextBase httpContext)
{
if (this.IsTablet(httpContext.GetOverriddenUserAgent()))
{
return "tablet";
}
if (this.IsMobile(httpContext.GetOverriddenUserAgent()))
{
return "mobile";
}
return "";
}
}}
In the above, please note that the IsMobile and IsTablet implementations should be taken with a grain of salt. I strongly suggest replacing them with a third party device detection algorithm (e.g. https://51degrees.com/). Also note here that this is where we are setting the "sc::device::current" key, that we saw earlier.
Finally, add the RegisterDeviceMode processor in the "initialize" pipeline:
<configuration xmlns:patch="http://www.sitecore.net/xmlconfig/">
  <sitecore>
    <pipelines>
      <initialize>
        <processor type="MobileDetectionProcessor.RegisterDeviceMode, MobileDetectionProcessor"/>
      </initialize>
    </pipelines>
  </sitecore>
</configuration>
And we are done! TESTING TIME!
Get yourself a default Sitecore installation, then go into the /Views folder and create two subfolders:
/views/Layouts
/views/Partials
Go into the Layouts folder, create a new file called "sample.cshtml" and ad the following:
<!doctype html>
<html>
<head>
</head>
<body>
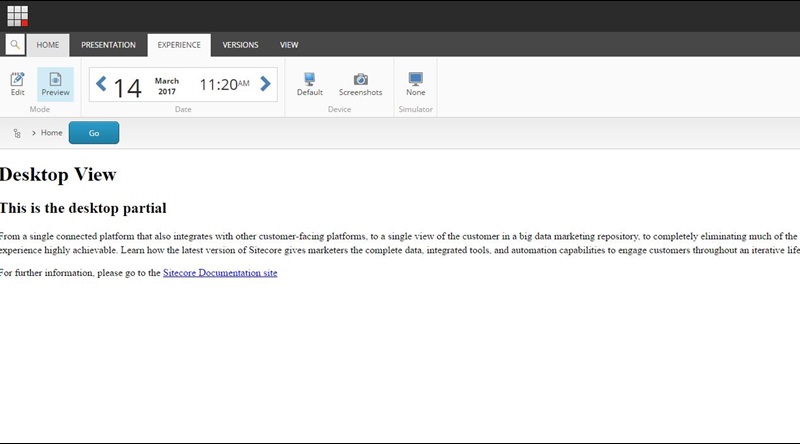
<p><h1>Desktop View</h1></p>
@Html.Sitecore().Placeholder("content")
</body>
</html>
Save and close. Then create another one, called "sample.Mobile.cshtml" and add the following:
<!doctype html>
<html>
<head>
</head>
<body>
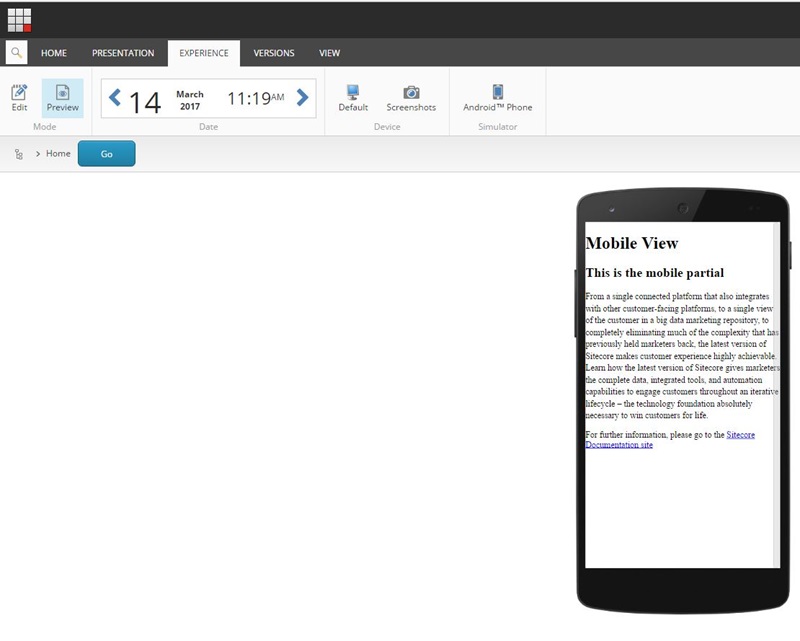
<p><h1>Mobile View</h1></p>
@Html.Sitecore().Placeholder("content")
</body>
</html>
Next, go into the Partials folder and add two files.
SampleView.cshtml:
<h2>This is the desktop partial</h2>and SampleView.Mobile.cshtml:
@Html.Sitecore().Field("Text")
<h2>This is the mobile partial</h2>
@Html.Sitecore().Field("Text")
That's all regarding files and filesystem. Now log onto Sitecore, and locate the Sample layout (/sitecore/layout/Layouts/Sample Layout). Go into the "Path" field and change the value to
/Views/Layouts/sample.cshtml
Then go into the Renderings/Sample folder (/sitecore/layout/Renderings/Sample) and create a new View rendering named "Sample View". Again, change its path to
/Views/Partials/SampleView.cshtml
Finally, go into /sitecore/layout/Placeholder Settings/content (a sitecore placeholder pre-installed) and add the "Sample View" to its allowed renderings.
Now you are almost set. Go into the pre-installed /Sitecore/Content/Home item, and make sure it is using the "Sample layout" layout. Then add the "Sample View" component into the "Content" placeholder. Save and smart publish the site.
To view, you can either:
- use an emulator to view the site or
- Go into page editor mode, choose "preview" and select a mobile device simulator.
This is how it looks in preview mode without a simulator:
And this is how it looks with the "android phone" simulator on:
In part 2, we'll further explore how to leverage this feature along with Sitecore's inherent ability to deliver different presentation details per device, to truly deliver a great experience both to the content authors and to end users.
Until then... Happy Coding!